One of the most important features of the espresso machine. Maybe, the most important.
Contents:
THE "SLAYER" SHOT (LONG PRE-INFUSION)
THE BLOOMING PROFILE
THE RAMP DOWN (DECLINING, "SPRING LEVER") PROFILE
USING RAMP DOWN TO FIX TOO COARSE GRIND "ON THE FLY"
TURBO SHOT
THE PLATINUM STANDARD: SLAYER OR BLOOMING + TURBO + RAMP DOWN
The flow control does make a difference in extraction - it just produces more flavorful and full-body drink, brings up more taste and mouthfeel. Of course, good and freshly roasted beans are most important, but changing the water speed during extraction also greatly contributes to very tasty espresso. No esotericism - just the laws of physics at work.
Everyone knows that "the grinder is more important than the espresso machine" (C). I think having flow control is just as important as a good grinder. I can't imagine what force in the universe would make me buy an espresso machine with constant water debit today! However, some people say flow control is unnecessary. It shows that they didn't even try to understand the subject.
Profiling is not very common for a few reasons:
- People don't know how dramatically it improves the taste.
- People mistakenly think it's hard and requires a lot of experience (just the opposite - it's much easier with it, you literally have control!).
- People mistakenly think it adds variables. In fact, the variables are still the same, but flow control greatly reduces the importance of their accuracy (for example, it reduces the importance of grind size preciseness to achieve the desired shot time - you can tweak on the fly).
- People mistakenly think that, to have profiling, they need a super-high-end machine, but they can add the FCD (Flow Control Device aka "paddle" aka "faucet") to any standard (not modified) E61 group. Also, they can install a cheap dimmer on many machines with a classic boiler (i.e. not with a thermoblock/thermocoil) to achieve the same goal (YouTube). If you're seriously considering a dimmer, it's best to go to a store that services and repairs espresso machines - so you don't harm your loved toy.
THE "SLAYER" SHOT (LONG PRE-INFUSION)
Enhances sweetness. Reduces sourness in light and medium roast. Improves the taste of beans roasted long ago and cheap beans. Prevents channeling. Allows to grind finer (to increase the extraction surface of the particles) without increasing the shot time or the risk of chocking the machine.
Pre-infusion, or pre-saturation, is the filling of the coffee with water at a low flow rate so that all the water remains in the puck and does not spill into the cup. The purpose: to prepare the coffee for the next step, extraction. Flow control allows you to do true pre-infusion. Without this mod, only "wetting", i.e. NOT pressurized moistening (the drops just fall on the coffee under the force of earth's gravity), is available in not-plumbed E61 machines. Real pre-infusion only happens when the pump is running (or in machines connected to the water supply without a running pump - using the natural pressure of the water supply). And what is meant by "pre-infusion" in various machines without the E61 group is a sad story.
Now let's break down the two points from the subheading in more detail:
- Enhances sweetness. It is easier for water to penetrate inside a swollen particle, so more water will pass through the particles, rather than between them, which will allow for a more complete extraction of flavor substances. This is especially valuable with light and light-medium roast beans, which are notoriously difficult to prepare as espresso because they are less extractable - they are less soluble and hardly "give off" flavoring substances. Light roasts are traditionally considered unsuitable for espresso, and many roasters write "espresso" on dark beans (i.e. "espresso roast" and dark roast have become synonymous), but connoisseurs adore a properly made espresso from ultra-light roast beans. However, if it is sour, then this indicates insufficient extraction - this is where a preliminary infusion comes to the rescue.
In fact, light to medium roasts are better suited for the blooming profile that will be described below - a more "powerful" pre-wetting option.
Dark roast beans, on the other hand, extract quite easily, sometimes even too easily. For them, pre-infusion can lead to over-extraction and increase bitterness, so for dark roasts, try to use a coarser grind and start brewing immediately at maximum flow, without soaking. However, pre-infusion can make espresso not only more bitter but also more flavorful - play around depending on the beans and your taste. Personally, I use pre-infusion with dark roast as well. In doing so, I was able to reduce bitterness by switching from a conical grinder to a flat one. Also, with darker beans the pre-infusion should be shorter - I use 10-12 seconds, while the classic recommendation for light beans is 20 seconds.
- Prevents channeling. During pre-infusion, the coffee particles swell and adhere more tightly to each other, which reduces the chances of channeling. As already mentioned, it's easier for water to penetrate inside a swollen particle, so it has less "reasons" to look for easy ways, i.e. punch through channels. Read in this article , "Pre-infusion prepares the puck for the sudden intake of high-pressure water, reducing the likelihood that it will become disrupted and cause channeling".
THAT'S NOT ENOUGH!
On most machines with a group other than E61, if there is pre-infusion, it is programmed for 5-10 seconds, which may not be enough. And even harmful: if only the upper part of the tablet is wet, and the lower part is left without pre-infusion at all, we get vertical unevenness - the wet part will be extracted differently than the dry part. How can we determine that the puck has moistened over its entire height and we can already start extraction? Very simply - by the drops that have appeared at the bottom of the basket (and even started to drip into the cup).
SLAYER SHOT
What is a "Slayer profile"? This is just a fancy name for longer pre-infusion until the first drops. The method is named after the expensive high-end Slayer machine - one of the first mass-produced pump machines (or even the first? I don't know...) with flow restriction (by the way, looks awesome!). Today, to use this method, you no longer need to buy a Slayer, which costs as much as a used Toyota - long-term pre-infusion can be reproduced on any machine with a restrictor or dimmer. Moreover, a simple machine with a flow control mod is even better because it provides unlimited profiling possibilities (let me remind you that on Slayer there is not a smooth change in water speed over the entire range, but one fixed position for a slow flow - better than nothing, but there's no flexibility involved).
THE "LOW FLOW" POSITION
At what flow rate should pre-infusion be done? I simply close the valve using my index finger as a stopper (i.e. between this position and full closure is the thickness of my finger).
There is a more mathematical option
WHEN TO STOP PRE-INFUSION AND START EXTRACTION?
The internet gives a few ideas:
- As soon as the first drops came out.
- Once 3g have spilled into the cup (my favorite option).
- Once 7 grams have spilled into the cup (as recommended on page 27 of the Slayer machine manual).
OK, THE ALGORITHM.
It doesn't impress with its complexity:
- Set the faucet to the "low flow" position and start the pump.
- As soon as the pre-infusion has come to an end, open the valve to maximum (or to the desired pressure) and perform normal extraction.
In this video you may notice that the total time was 57 seconds - 26 seconds pre-infusion and 31 seconds brewing. The Slayer shot can also be seen in this video, and in this.
Obviously, the benefits of a long "soak", which eliminates vertical unevenness, are particularly pronounced in the case of a tall coffee puck, i.e. if you are using a portafilter with a smaller than 58 mm diameter, or if you are loading a large dose (e.g. 20 g or more) into a 58 mm portafilter.
THE BLOOMING PROFILE
Same effects as the Slayer shot, only more pronounced
It's a kind of advanced pre-infusion. The regular long pre-infusion is uneven - the top layers are pre-infused much longer than the bottom layers. In fact, the bottom layers are not pre-infused at all - as soon as the water reaches them, the puck begins to resist and the main extraction starts. As this video says, Slayer shot is simultaneously over-extracted on the top and under-extracted on the bottom. Blooming eliminates that unevenness - the upper layer is pre-infused for 35 sec while the lower one for 30, which is practically the same. Also, acting longer increases the effect.
In addition, blooming is more convenient - you don't need to stare at the bottom of the basket, waiting for the first drops before you open the paddle (short pre-infusion finished before the first drops is not discussed at all - we want the whole puck to be wet). On blooming, you always start counting seconds at the same moment - when you see 35 sec on the timer (or whatever time you choose). In contrast to that, the Slayer-style pre-infusion can have different length from brew to brew (for example, 15 sec, and the next time - 19 sec), so it's hard to calculate the pouring time looking at the timer (you need to add the desired time to another number, which can be different each time).
Here's the blooming profile's algorithm (don't forget to grind a bit finer!):
- Start the pump with the faucet completely open.
- When 5 seconds are on the timer (strictly speaking, when the pressure begins to rise), completely shut off the flow in one swift motion. That's 5 sec on my machine, it may be a little faster or slower on yours. Even if the drops have not yet appeared, they will certainly appear in a second or two. This triggers "blooming", a term that comes from drip and French press brewing. There can be drops dripping into the cup during blooming - this is completely normal.
- When 30 seconds of blooming have elapsed (i.e. the timer shows 35 seconds in my case), open the faucet to the maximum (or to the desired pressure).
- Perform the usual extraction until the target weight in the cup is reached.
This profile contributes to a richer flavor because it increases extraction. Here's what it looks like numerically (from this video):
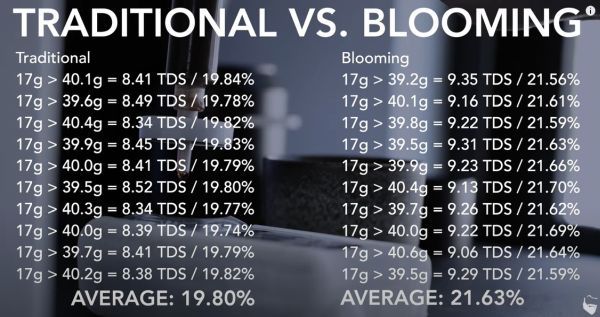
You can do blooming with the E61 even if it doesn't have FCD. However, using the E61 lever only is hard since it can take a few seconds to find the "pump off" position with no risk that the solenoid valve will destroy the puck. If you are too slow, the brewing will start rather than blooming. It's much easier to stop the flow with the paddle immediately after 5 seconds.
BTW...
If your machine has profiling (or the E61 group) but you for some reason don't use blooming, it can save the shot if the grind turned out to be too fine. If you start making espresso and find that the coffee is barely flowing out of the basket, immediately shut off the flow for half a minute to let the puck saturate, and then re-open the paddle. You'll see that the flow is faster! This will prevent (or at least reduce) over-extraction. I once grinded so fine that the coffee wasn't dropping at all. I immediately closed the valve for 30 seconds, and when I opened it again, the jet was there! This tip might be especially helpful when you've started new beans and don't yet know how to grind them.
THE RAMP DOWN (DECLINING, "SPRING LEVER") PROFILE
Increases body and richness, but prevents over-extraction. Reduces the bitterness of dark roasts. Improves the taste of blends. Removes the "stale taste" of beans roasted not recently. Prevents channeling.
Just close the paddle during the extraction:
The profile mimics a manual spring machine, where the pressure is decreasing naturally as the spring is relaxing. This leads to very tasty shots, which is why many people are fanatical about these machines and pay a lot of money for them. The following video shows how the pressure in a real spring lever (from the 1960s, BTW!) is dropping from 9.5 to 4.5:
You can restrict the flow either gradually or in 2 discrete steps (for example, decrease to 6 bar when there are 10-15 gr in the cup, and then to 4 bar on 20-25 gr), or even in 1 step (that's what I do on 6-bar turbo shots - I jump to 4 bar when there are 20 grams in the cup). By the way, the 1 step restriction mimics the rump down profile as it's implemented in the Slayer machine, whose paddle has 3 fixed positions: fully open, partially open (the "low flow" mode), and fully closed. So, strictly speaking, only the 1 step reduction has the right to be called a Slayer shot, not any ramp down! :-)
A SHORT PHYSICS LESSON
In the process of making espresso, more and more coffee substances (particles) end up in the cup, and accordingly, less and less of them remain in the basket. The puck gradually degrades and breaks down, becoming loose and porous. The same constant flow of water still continues, but over time the puck loses its ability to resist this flow as effectively as it did in the beginning. As a result, the coffee gets less and less extracted, and more and more just diluted with water, resulting in a less concentrated beverage - with weak body and taste.
The solution is obvious - gradually weaken the flow over the course of the brewing. This improves the taste in all roasts, but especially in dark beans, which are characterized by an easier (and therefore faster) extraction - ramping down significantly decreases bitterness.
RAMPING DOWN PREVENTS THE JET FROM BLONDING
When the pressure is being lowered during the extraction, there is no (or at least much less) blonding of the jet, as can be observed in this video. I never paid attention to this point before, but after the video I checked - indeed, there is almost no blonding. The color changes from very dark brown in the beginning (almost black - because of the long "bloom" and turbo which increase extraction) to medium brown at the end. However, the color never reaches even a light brown, not to mention yellow (as it was always happening in my previous twice more expensive Bezzera Duo DE without flow control)!
Many people use jet blonding as an indicator that it's time to stop brewing. OMG! It's an indicator that it's time to buy a machine with profiling (or install an FSD or a dimmer)!
THE BREWING IS LASTING LONGER
Note that the pouring time of "lever" shots stretches to 35-40 seconds, which is longer than the classic 25-30 seconds. This is understandable - we want to pour the same amount of water (to get the same weight of the drink), but the flow gradually decreases. Look at the clip from the store where I bought my ECM Puristika. The dropping from 9.5 to 2.5 bar was 38 seconds:
And in the next video the shot lasted 45 seconds (from 12 to 1.5 bar):
USING RAMP DOWN TO FIX TOO COARSE GRIND "ON THE FLY"
The "aggressiveness" of applying the ramp down profile depends not only on degree of the roast but also on the grind size correctness. If it's finer than the ideal size then wait, and then decline slightly (if extremely fine, make a ristretto with no decline at all). But what's important is that the profile is fantastic in fixing too coarse grind size.
If you start making espresso and find that the flow is too fast, apply the profile immediately and aggressively. If you see the coffee jet flowing at crazy speed, quickly move the paddle to a position near the full closing. That will reduce the water speed to normal (as it would be with a perfect grind) and extend the contact time of the water with the coffee to extract more flavoring substances, preventing (or at least reducing) under-extraction. In the following video, the man increased the extraction time to 27 seconds using this method:
Without flow control, the entire dose would "spit out" into the cup in a few seconds and you'd just get slightly tinted water. Even if the "saved" shot isn't perfect, it's likely to be rich and flavorful, and certainly won't be spit down the sink. At worst, you'll get something between espresso and regular coffee, which isn't so bad either (we drink regular coffee!). At best, you'll enjoy a deliciousness you never knew existed!
I've had it happen to me more than once that when I grinded coarser than necessary, I got a drink with absolutely heavenly flavor (even better than with perfect grinding), which contradicts the classic espresso recipe. After that I started to catch myself thinking that I was secretly trying to "make a mistake" with the grind in the coarser direction. Later, I came across information about turbo shot on the internet (will be discussed next). It turned out that I discovered it myself! The turbo uses a coarser larger grind than usual, but if it's coarse, a sharp almost full closing of the paddle can partially correct this mistake. In this case, the restrictor will act like a pressurized basket - the flow will be slow not because of coffee resistance, but because of an external factor.
All that means that the stepless grinder is less critical now. Mine is stepless, but I never go to half notches. Moreover, plus or minus two-three notches from the ideal setting don't kick me off from the zone of very taste espresso - I easily correct grinding errors with the paddle. This is very different from my previous Bezzera Duo DE, where the slightest deviation from the perfect grind size worsened the taste and there was no way to fix it. The degree of forgiveness of a machine with flow control is unprecedented - a bad shot is almost an impossible task. In fact, that is the classical reason why people love their fully manual toys. In our advanced times, this love is being transferred to pump machines with flow control. Caution: stay away from computerized machines on which it's not possible to change the flow rate manually once the brewing has started!
THE GOLD STANDARD
The combination of pre-infusion (be it the Slayer or the blooming profile) and declining is considered by many as the "gold standard". The overall algorithm is simple and obvious: do the Slayer or the blooming profile, then open the flow (fully or until the desired pressure), and then gradually decrease it.
I roast beans at home, but, for the sake of experimentation, I've made espresso with ordinary supermarket beans using the gold standard. The result was better than in many cafes where baristas use freshly roasted beans and high end espresso machines without flow control.
TURBO SHOT
More sweetness and clarity, the chocolate notes are strongly emphasized, the taste is as rich and intense as possible.
A funny thing happened to me once. After making a shot, I always stir my espresso with a very small spoon and then traditionally lick it (now you know my secret!). When I licked it after the first turbo shot I made, I was shocked - there wasn't much liquid, but the taste was so concentrated and sweet (almost sugary) that I thought it was ice cream or candy! No wonder the traditional 9 bar 25-30 sec espresso has tasted "like water" to me ever since, and I quickly gave it up in favor of the turbo.
The method was born from mathematical modeling by a group of scientists. It's based on the following two principles:
- 6 bar of pressure.
- The brew time is 15 seconds or even less (according to some sources, down to 7, but I would not go below 12). In some videos, the timeframe is extended to 20 seconds. In my experience, the ideal time in terms of taste is 13-15 seconds. The time is counted from the moment the coffee starts flowing from the basket (ha-ha, try a 7-second shot, counting from the moment the pump was turned on!).
- Coarser grinding. When coffee is ground fine, more acidic compounds are extracted, resulting in a sour taste. That's why the turbo is a great weapon to combat sour espresso!
- Smaller coffee dose (the common recommendation is 15 gr). I load 15-17 gr (instead of the previous 19 gr), depending on the beans.
- Greater brew ratio (the common recommendation is 1:3). I brew 34-40 gr (1:2 - 1:2.7).
There are two competing factors:
- The finer the grind, the larger the contact surface of coffee with water, so the more flavoring substances are "washed out" from the particles. This increases the extraction. However, a higher pressure is needed to push the water through the puck.
- The finer the grind and the higher the pressure, the more unevenly the water flows and the more "unaffected" (dry) areas remain (since a lot of water is moving through channels). This reduces the overall extraction, with the areas of the puck near channels being over-extracted.
You'll find many more intriguing details in the next two videos - by Lance Hedrick and James Hoffmann. All espresso lovers should definitely watch them!
Turbo is not a profile per se since it's not about changing the flow rate during brewing. So whatever you think about profiling (even if you're an ardent opponent!), try turbo now - it can be done on literally any machine! Change your OPV to 6 bar, and if that's impossible or difficult, achieve 6 bar by regulating the pressure with grind coarseness. The grind should be as coarse as possible, but fine enough to still accumulate 5.5 - 6 bar in the group. A shot of more than 18 seconds indicates that the grind is too fine. If you have flow control, then you can also try turbo by limiting the pressure to 6 bars with a paddle or dimmer.
THE PLATINUM STANDARD: SLAYER OR BLOOMING + TURBO + RAMP DOWN
The turbo is cool on its own, but combining it with other classic profiles improves the taste even more.
Usually I do a turbo shot after a 30 second blooming (or just pre-infusion for dark roast). Of course, then the countdown of the seconds starts from the moment the faucet is opened.
But I am not brewing with constant 6 bar - most often after some time I apply the "spring lever" profile. As a rule (with a perfect grind), I jump to 4 bar when there are 20 grams in the cup, as I already mentioned. Sometimes, after that, I gradually turn the paddle until it is completely closed - so that the last 2-4 grams spill out from the pressure that has accumulated in the group before.
Someone might say that on a turbo there is less need to decrease the flow, because brewing at 6 bars is in itself a decrease compared to 9 bars (not to mention 11-12, which many machines are set to). In addition, the puck erosion occurs during less time. All this is true, but there is one more factor - since turbo increases extraction, the erosion is stronger. The following video shows how the pressure can drop on the turbo (but this does not always happen, this is rather an extreme case):
I even left a comment under this video:
"We see that pressure is dropping during the shot since the puck erodes. The coffee is less and less extracted, and more and more just diluted with water, so the almost black jet becomes blond. You badly need to install the Flow Control Device and gradually decrease the flow to prevent that!"
In the beginning of my "love story" with turbo shots, the "spring lever" profile sometimes prolonged the extraction (after the bloom was finished) up to 25 seconds. But then I discovered that it tastes better if I grind even a little coarser than the turbo normally requires. So my pouring now lasts 15-18 seconds including ramp down - I turn off the pump when the timer shows 50-53 sec. Actually, my turbo shots last as long as they would have lasted without flow restriction, or just 2-3 seconds longer.
ABOUT THE PADDLE MOVEMENT RANGE
Some YouTube videos that use a flow control device with a small ball consider the 1 1/4 turn valve position as "full opening". Strictly speaking this is not true, the full travel is 1 3/4 turns, and on some devices even 2. But the "extra" part of the full physical range gives so insignificant change in the flow rate that it makes no sense to get into it (unless you enjoy the process of turning the knob itself, ha-ha!). The thing is that all the "action" takes place in the zone near the closing - there every millimeter of travel is significant. For example, the difference between "9:00" and "7:30" is more important than between "7:30" and physical full opening.
Any range which is less than 1 turn is intuitive - just look at the paddle and you can see "where you are". But 1 full turn is already problematic because it is not immediately clear whether the valve is fully closed or opened by 1 turn (the same with even greater opening - is it a quarter turn or one and a quarter?). Therefore, a range of 3/4 of the full turn seems ideal.
The only difference between "logical" full opening (3/4 turn) and physical full opening (1 3/4 - 2 turns) is that with the latter, the maximum group pressure will be reached 1-2 seconds faster (or even a fraction of a second - I didn't measure). This does not have any practical significance.
Even a slightly smaller range is sufficient, as on the Lelit Bianca, where the paddle touches the housing at the 10 o'clock and 2 o'clock positions. In fact, even half a turn would be enough.